What is 4 Corners?This is a strategy designed to get students to think about how or what they agree with and to what extent. Traditionally, a question is posed to students. Each corner of the room is labeled with an agree, disagree, and to what extent statement. Students think about the question and then move to the corner. From there you could call on people to explain their reasoning or set up a debate. Here we will look at how to use OneNote to facilitate this strategy. In this case, while the kids lose the movement they do gain the ability for all to speak their mind. You could combine the two strategies and allow students to record their thinking and then move to the area of their choice or vice versa. OneNote Page SetupIn this OneNote page I created a 2 column and 2 row table. Label those with your disagree and agree statements. The prompt is written off to the side. Students then choose which topic they agree with. They click in the box they would like to talk about. At the top they go to the Insert Tab and choose either Record Audio or Record Video. You can then set parameters as to how long or what should be covered in the videos. 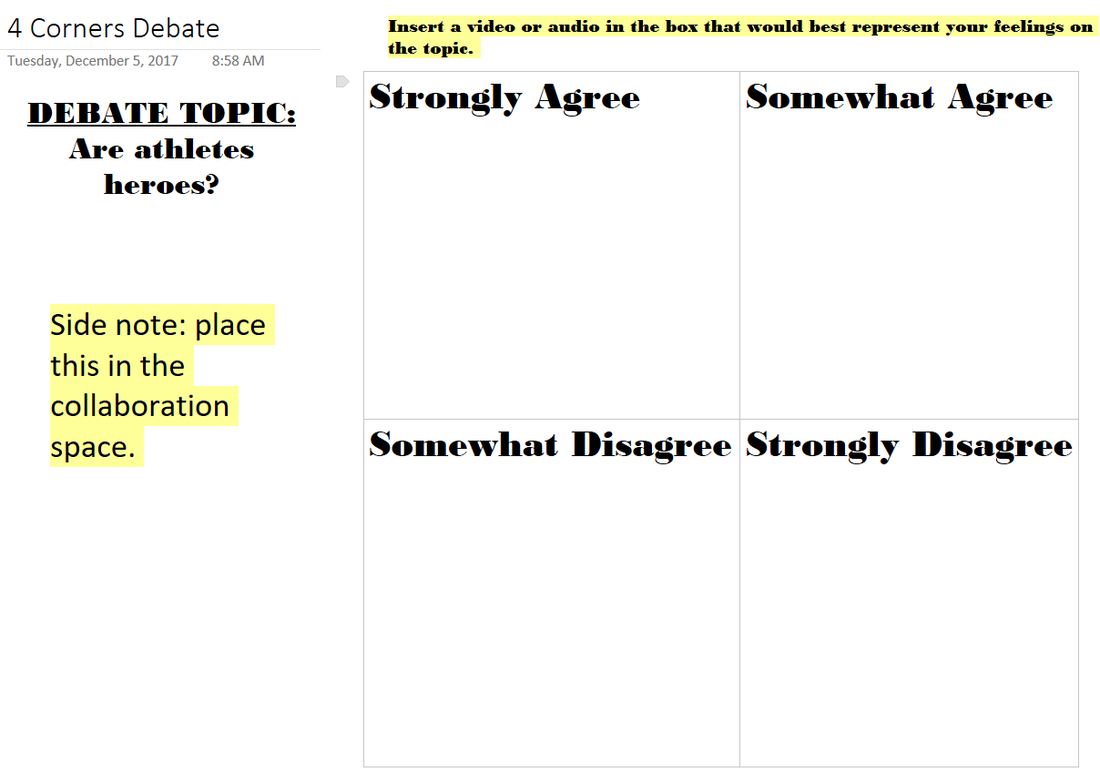
0 Comments
The "Say Something" strategy uses pauses and interruptions in a student's reading of text, to give them time for thought and reflection. This post will show you how to use the audio/video features in OneNote to use this strategy. Creating Your OneNote PageFirst, choose your text and break it up into sections. Find places in the text where you want them to answer a question or reflect upon what they read. On a OneNote page, create a 2 column table and enough rows for your different sections of text. Column 1 will be your text, label the first row in the first column with the name of your text. In the 2nd column, 1st row, you will put in the questions that you wish the students to answer as they read. In the rest of the rows in Column 1, paste your sections of text. Each section in a new row. Example is below. 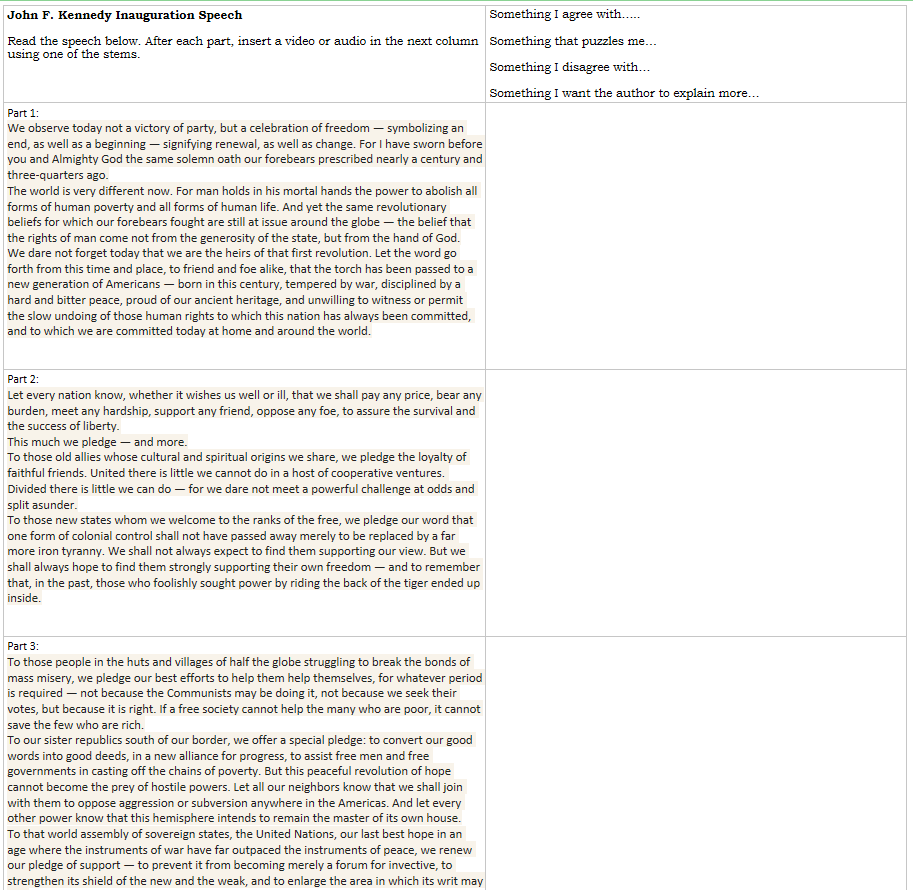 Collaboration Space vs. Notebook SpaceThe question now, where do you want to distribute the assignment? Placing it in the collaboration space would allow all students to see/hear each other's responses. It also allows them to delete.....(you can always restore through page versions) but some teacher's or even students may not be comfortable with this. The other option is to send the assignment into each student's notebook. This would keep their answers private. So other's can respond, you could then copy and paste videos/audio that were thought provoking or well done and put them in the collaboration space or content library for all students to then view and possibly discuss later on. Directions for the AssignmentHave students begin reading the first section. Then choose a question they would like to answer. Each student will then place their cursor in the 2nd column of the first section of reading. Go to the Insert tab at the top of OneNote. They can choose to Record Audio or Record Video and respond. After, they move onto the next section of text and continue. 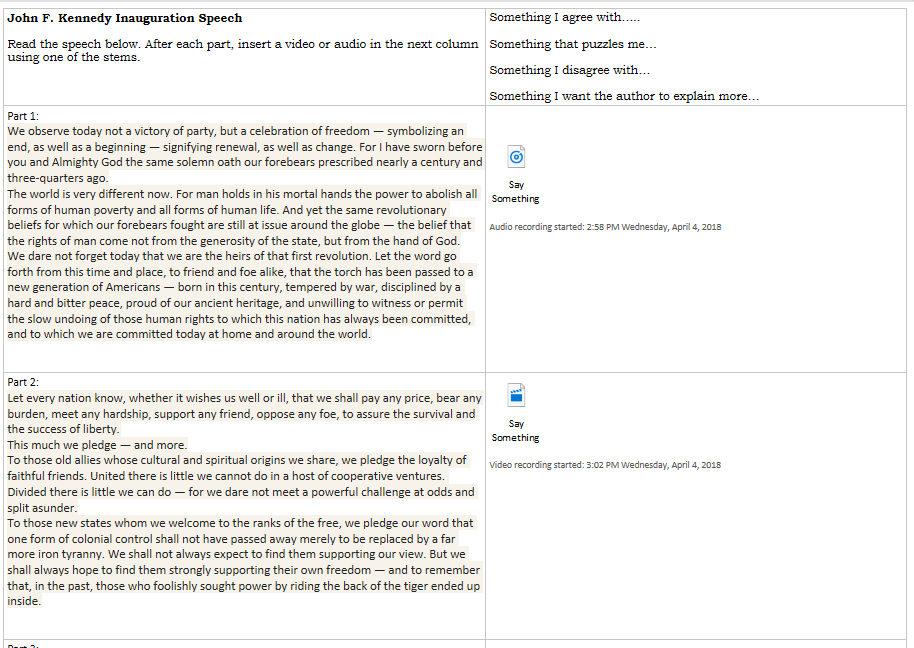 Examples of QuestionsSomething I agree with is... Something that puzzles me is... Something I am remind of when I read.... A new idea is... Something I disagree with is... Something I wish was explained more is... Something I would like to talk more about... Something I don't understand is... Here is a question that I have... I enjoyed the part when... I predict...will happen next. This reminds me of when....happened. If you like this strategy and use it your classroom, let me know how it turns out! 
My inspiration and thoughts for this post came from Twitter. The GIFs below were tweeted @OneNoteC. The one on the left was created by @PaphitisN. It is a simple how-to but it got me thinking. Students could create their own GIF's with the same ideas in mind. They can use screenshots, pictures, video, words, to simplify and summarize important information. After all a GIF can only be 15 seconds max, so students would need to be able to simplify and explain within that time frame.
Topics for Gif's
1. Explaining Steps- Steps to completing a math problem, process in science or writing
2. Timeline- create a timeline of events 3. How-To - show how they completed something or a finished piece of work 4. Description- use GIF's to describe vocabulary terms, a book, article, concept 5. Plot Diagram- students could create an image for each part of a plot diagram, and then create a GIF showing the transitions. 6. Summarize- using pictures and text students can summarize content 7. Vocabulary- students can use pieces of video or images to explain vocabulary terms in a non-linguistic manner How to Make a GIF
Here is a quick GIF that I made on "How to Make a GIF." It is pretty simple.
1. Students need to first come up with their process or explanation. ' 2. Make a series of images or text explaining the content. 3. Screenshot or use the snipping tool to take images of the steps. 4. Then upload them at https://giphy.com/create/gifmaker. 5. They will have options to set the timing for each picture, add stickers or captions, and then upload it to the site. 6. After it is uploaded they can copy that URL and submit it. In my school's case, they could turn it into the collaboration space on OneNote to share with their peers. Classroom Example
What other ways can you see students creating GIFs to showing knowledge of a subject?
|
AuthorFollow me on Twitter @Mer_Townsend Archives
April 2018
Categories
All
|
 RSS Feed
